This is the Just Share What I founded a post of Funny Linux Commands ... :)
1. Command: sl (Steam Locomotive)
You might be aware of command ‘
ls‘
the list command and use it frequently to view the contents of a folder
but because of miss-typing sometimes you would result in ‘
sl‘, how about getting a little fun in terminal and not “
command not found“.
Install sl
root@tecmint:~# apt-get install sl 		(In Debian like OS)
root@tecmint:~# yum -y install sl 		(In Red Hat like OS)
Output
root@tecmint:~# sl
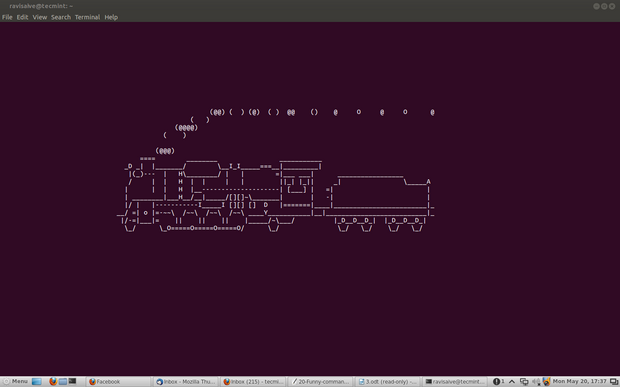
sl command
This command works even when you type ‘
LS‘ and not ‘
ls‘.
2. Command: telnet
No!
No!! it is not as much complex as it seems. You would be familiar with
telnet.
Telnet is a text-oriented bidirectional network protocol over network.
Here is nothing to be installed. What you should have is a Linux box and
a working Internet.
root@tecmint:~# telnet towel.blinkenlights.nl

telnet command
3. Command: fortune
what about getting your random
fortune, sometimes funny in terminal.
Install fortune
root@tecmint:~# apt-get install fortune 	(for aptitude based system)
root@tecmint:~# yum install fortune 		(for yum based system)
root@tecmint:~# fortune

You're not my type.  For that matter, you're not even my species!!!
Future looks spotty.  You will spill soup in late evening.
You worry too much about your job.  Stop it.  You are not paid enough to worry.
Your love life will be... interesting.
4. Command: rev (Reverse)
It
reverse every string given to it, is not it funny.
root@tecmint:~# rev

123abc
cba321

xuniL eb ot nrob
born to be Linux
5. Command: factor
Time for some
Mathematics, this command output all the possible factors of a given number.
root@tecmint:~# factor

5
5: 5

12
12: 2 2 3

1001
1001: 7 11 13

5442134
5442134: 2 2721067
6. Command: script
OK fine this is not a command and a script but it is nice.
root@tecmint:~# for i in {1..12}; do for j in $(seq 1 $i); do echo -ne $i×$j=$((i*j))\\t;done; echo;done

1×1=1
2×1=2	2×2=4
3×1=3	3×2=6	3×3=9
4×1=4	4×2=8	4×3=12	4×4=16
5×1=5	5×2=10	5×3=15	5×4=20	5×5=25
6×1=6	6×2=12	6×3=18	6×4=24	6×5=30	6×6=36
7×1=7	7×2=14	7×3=21	7×4=28	7×5=35	7×6=42	7×7=49
8×1=8	8×2=16	8×3=24	8×4=32	8×5=40	8×6=48	8×7=56	8×8=64
9×1=9	9×2=18	9×3=27	9×4=36	9×5=45	9×6=54	9×7=63	9×8=72	9×9=81
10×1=10	10×2=20	10×3=30	10×4=40	10×5=50	10×6=60	10×7=70	10×8=80	10×9=90	10×10=100
11×1=11	11×2=22	11×3=33	11×4=44	11×5=55	11×6=66	11×7=77	11×8=88	11×9=99	11×10=110	11×11=121
12×1=12	12×2=24	12×3=36	12×4=48	12×5=60	12×6=72	12×7=84	12×8=96	12×9=108	12×10=120	12×11=132	12×12=144
7. Command: Cowsay
An
ASCII cow in terminal that will say what ever you want.
Install Cowsay
root@tecmint:~# apt-get install cowsay 		(for Debian based OS)
root@tecmint:~# yum install cowsay		(for Red Hat based OS)
Output
root@tecmint:~# cowsay I Love nix

 ____________
< I Love nix >
 ------------
        \   ^__^
         \  (oo)\_______
            (__)\       )\/\
                ||----w |
                ||     ||
How about pipelineing ‘
fortune command‘, described above with cowsay?
root@tecmint:~# fortune | cowsay

 _________________________________________
/ Q: How many Oregonians does it take to  \
| screw in a light bulb? A: Three. One to |
| screw in the light bulb and two to fend |
| off all those                           |
|                                         |
| Californians trying to share the        |
\ experience.                             /
 -----------------------------------------
        \   ^__^
         \  (oo)\_______
            (__)\       )\/\
                ||----w |
                ||     ||
Note: ‘
|‘
is called pipeline instruction and it is used where the output of one
command needs to be the input of another command. In the above example
the output of ‘
fortune‘ command acts as an input of ‘
cowsay‘ command. This pipeline instruction is frequently used in scripting and programming.
xcowsay is a graphical program which response similar to
cowsay but in a graphical manner, hence it is
X of cowsay.
apt-get insatll xcowsay
yum install xcowsay
Output
root@tecmint:~# xcowsay I Love nix

xcowsay command
cowthink is another command just run “cowthink Linux is sooo funny” and see the difference in output of cowsay and cowthink.
apt-get insatll cowthink
yum install cowthink
Output
root@tecmint:~# cowthink ....Linux is sooo funny
 _________________________
( ....Linux is sooo funny )
 -------------------------
        o   ^__^
         o  (oo)\_______
            (__)\       )\/\
                ||----w |
                ||     ||
8. Command: yes
It is funny but useful as well, specially in scripts and for
System Administrators where an automated predefined response can be passed to terminal or generated.
root@tecmint:~# yes I Love Linux

I Love Linux
I Love Linux
I Love Linux
I Love Linux
I Love Linux
I Love Linux
I Love Linux
I Love Linux
I Love Linux
I Love Linux
I Love Linux
I Love Linux
Note: (Till you interrupt i.e
ctrl+c).
9. Command: toilet
what?
Are u kidding, huhh no! Definitely not, but for sure this command name
itself is too funny, and I don’t know from where this command gets it’s
name.
Install toilet
root@tecmint:~# apt-get install toilet
root@tecmint:~# yum install toilet
Output
root@tecmint:~# toilet tecmint

mmmmmmm                        "             m
   #     mmm    mmm   mmmmm  mmm    m mm   mm#mm          mmm    mmm   mmmmm
   #    #"  #  #"  "  # # #    #    #"  #    #           #"  "  #" "#  # # #
   #    #""""  #      # # #    #    #   #    #           #      #   #  # # #
   #    "#mm"  "#mm"  # # #  mm#mm  #   #    "mm    #    "#mm"  "#m#"  # # #
It even offers some kind of color and fonts style.
root@tecmint:~# toilet -f mono12 -F metal Tecmint.com
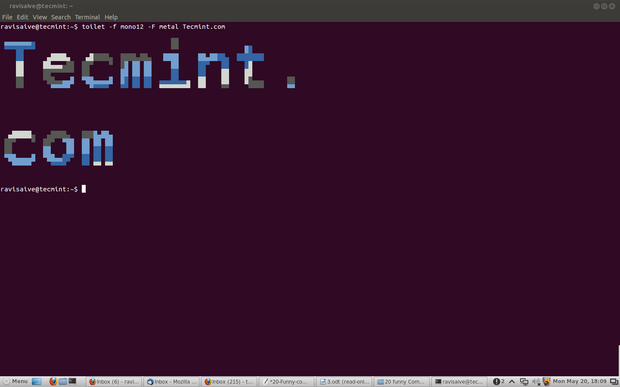
toilet command
Note:
Figlet is another command that more or less provide such kind of effect in terminal.
10. Command: cmatrix
You might have seen Hollywood movie ‘
matrix‘ and would be fascinated with power,
Neo was provided with, to see anything and everything in matrix or you might think of an animation that looks alike
Hacker‘s desktop.
Install cmatrix
root@tecmint:~# apt-get install cmatrix
root@tecmint:~# yum install cmatrix
Output
root@tecmint:~# cmatrix
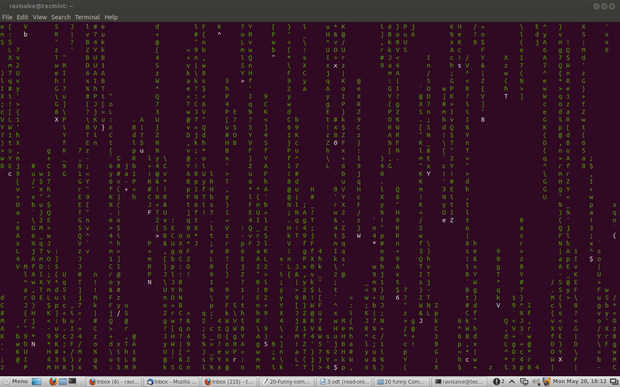
cmatrix command
11. Command: oneko
OK
so you believe that mouse pointer of Linux is the same silly
black/white pointer where no animation lies then I fear you could be
wrong. “
oneko“ is a package that will attach a “
Jerry“ with you mouse pointer and moves along with you pointer.
Install cmatrix
root@tecmint:~# apt-get install oneko
root@tecmint:~# yum install oneko
Output
root@tecmint:~# oneko

oneko command
Note: Once you close the terminal from which
oneko was run,
jerry will disappear, nor will start at start-up. You can add the application to start up and continue enjoying.
12. Fork Bomb
This is a very nasty piece of code. Run this at
your own risk.
This actually is a fork bomb which exponentially multiplies itself till
all the system resource is utilized and the system hangs. (To check the
power of above code you should try it once, but all at your own risk,
close and save all other programs and file before running
fork bomb).
root@tecmint:~#  ){
){  :& }:
:& }:
13. Command: while
The below “
while” command is a script which provides you with colored date and file till you interrupt (
ctrl + c). Just copy and paste the below code in terminal.
root@tecmint:~# while true; do echo "$(date '+%D %T' | toilet -f term -F border --gay)"; sleep 1; done
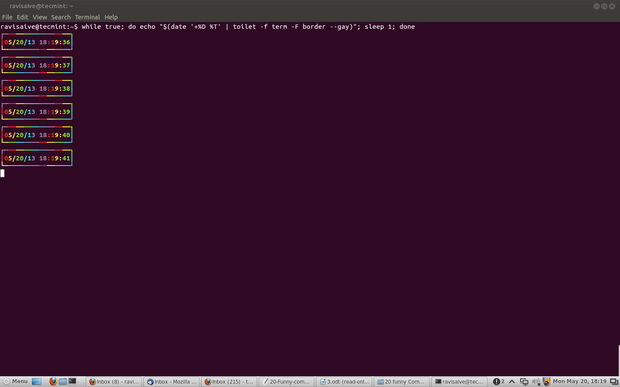
Linux while command
Note:
The above script when modified with following command, will gives
similar output but with a little difference, check it in your terminal.
root@tecmint:~# while true; do clear; echo "$(date '+%D %T' | toilet -f term -F border --gay)"; sleep 1; done
14. Command: espeak
Just
Turn the Knob of your multimedia speaker to full before pasting this
command in your terminal and let us know how you felt listening the
god’s voice.
Install espeak
root@tecmint:~# apt-get install espeak
root@tecmint:~# yum install espeak
Output
root@tecmint:~# espeak "Tecmint is a very good website dedicated to Foss Community"
15. Command: aafire
How about fire in your terminal. Just type “
aafire” in the terminal, without quotes and see the magic. Press any key to interrupt the program.
Install aafire
root@tecmint:~# apt-get install libaa-bin
Output
root@tecmint:~# aafire

aafire command
16. Command: bb
First install “
apt-get insatll bb” and then, type “
bb” in terminal and see what happens.
root@tecmint:~# bb

bb command
17. Command: url
Won’t it be an awesome feeling for you if you can update you
twitter status from command line in front of your friend and they seems impressed. OK just replace
username,
password and
your status message with your’s
username,
password and “
your status message“.
root@tecmint:~# url -u YourUsername:YourPassword -d status="Your status message" http://twitter.com/statuses/update.xml
18. ASCIIquarium
How it will be to get an
aquarium in terminal.
root@tecmint:~# apt-get install libcurses-perl
root@tecmint:~# cd /tmp
root@tecmint:~# wget http://search.cpan.org/CPAN/authors/id/K/KB/KBAUCOM/Term-Animation-2.4.tar.gz
root@tecmint:~# tar -zxvf Term-Animation-2.4.tar.gz
root@tecmint:~# cd Term-Animation-2.4/
root@tecmint:~# perl Makefile.PL &&  make &&   make test
root@tecmint:~# make install
Install ASCIIquarium
Now Download and Install
ASCIIquarium.
root@tecmint:~# cd /tmp
root@tecmint:~# wget http://www.robobunny.com/projects/asciiquarium/asciiquarium.tar.gz
root@tecmint:~# tar -zxvf asciiquarium.tar.gz
root@tecmint:~# cd asciiquarium_1.1/
root@tecmint:~# cp asciiquarium /usr/local/bin
root@tecmint:~# chmod 0755 /usr/local/bin/asciiquarium
And finally run “
asciiquarium” or “
/usr/local/bin/asciiquarium“ in terminal without quotes and be a part of magic that will be taking place in front of your eyes.
root@tecmint:~# asciiquarium
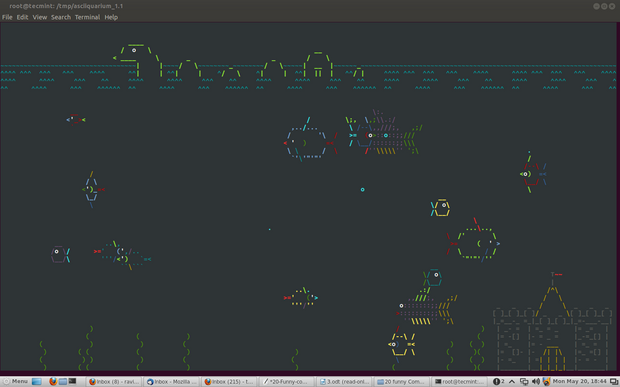
aquarium command
19. Command: funny manpages
First install “
apt-get install funny-manpages” and then run man pages for the commands below. Some of them may be
18+, run at your own risk, they all are too funny.
baby
celibacy
condom
date
echo
flame
flog
gong
grope, egrope, fgrope
party
rescrog
rm
rtfm
tm
uubp
woman (undocumented)
xkill
xlart
sex
strfry
root@tecmint:~# man baby
20. Linux Tweaks
It is time for you to have some one liner
tweaks.
root@tecmint:~# world

bash: world: not found
root@tecmint:~# touch girls\ boo**

touch: cannot touch `girls boo**': Permission denied
root@tecmint:~# nice man woman

No manual entry for woman
root@tecmint:~# ^How did the sex change operation go?^

bash: :s^How did the sex change operation go?^ : substitution failed
root@tecmint:~# %blow

bash: fg: %blow: no such job
root@tecmint:~# make love

make: *** No rule to make target `love'.  Stop.
$ [ whereis my brain?
sh: 2: [: missing ]
% man: why did you get a divorce?
man:: Too many arguments.
% !:say, what is saccharine?
Bad substitute.
server@localhost:/srv$ \(-
bash: (-: command not found
Linux is sexy:
who | grep -i blonde | date; cd ~; unzip; touch; strip; finger; mount; gasp; yes; uptime; umount; sleep (If you know what i mean)
There are certain other but these don’t work on all the system and hence not included in this article. Some of them are man
dog ,
filter,
banner, etc.
Have fun, you can say me thanks later

yup your comment is highly appreciated which encourages us write more.
Tell us which command you liked the most. Stay tuned i will be back soon
with another article worth reading.
Credit to
Avishek Kumar
>>
UTEE
Ref : http://www.tecmint.com/20-funny-commands-of-linux-or-linux-is-fun-in-terminal/


 or
or 


