Hi Guys,
You may be face this error on ESXi server after deploy the vm image onto ESXi.
" The attempted operation cannot be performed in the current state (Powered Off)"
After convert the vm, you will try power-on to the vm image. But vm can't boot up and it's only show above error at the console. And you can't power-off to that vm image also. This may occur relatively snapshot of vm image.
Here I will show how to solve this error.
First, you need to power-off the vm, but you can't power off from vSphere or vCenter.
So login to the ESXi server via ssh.
And use the "esxtop" and need to find out the WID of that vm's process and kill it.
#esxtop
By default, esxtop won't show the WID, you need to enable in the feild order.
So Press "f"
and choose the WID feild and press "Enter".
Now it's showing WID at the esxtop field. And record the WID of your vm name.
And To kill the process, press "k" and put the WID of your vm then press enter . Now you can quit from the esxtop, Press "q". Check at the vSphere, you will be see your vm is already power off.
Now you need to go VM folder location, So browse the datastore, and find your vm image folder and browse it.
There, you will be found "xxxxx.vmsd" file and delete it.
Now you can power-on the vm image again, It will up successfully without error. :)
>>
UTEE
Ref : http://kb.vmware.com/selfservice/microsites/search.do?language=en_US&cmd=displayKC&externalId=1000959
Showing posts with label VMware. Show all posts
Wednesday, 7 August 2013
Thursday, 9 May 2013
VMware Hands on Labs Online – Beta ( VMware vCloud Infracture) !!! (Avaliable For Everybody)
Hi Guys,
I would like to share This VMware Hand-on Labs with you..
It is completely free but not for the whole vmware technologies.
But I'm think that you will be satisfied after you joined this labs.
Ok Let's go
1) Go to the this link ... http://communities.vmware.com/community/vmtn/resources/how
2) And Click on the "VMware Hands-on Labs – Public Beta Interest List"
3) On the next link click "next"
4) Then, fill the require information, then click "submit"
5) After that, you may be wait 1 or 2 day from their mail to set the password to access lab. After got the email from ProjectNee, set the password for your account and Join the labs... :)
6) After set the password for your account, go to this link and put your email address and password to get lab with your account https://www.projectnee.com/HOL/
7) Here, Now you can join the lab by action on "ENROLL" button.
>>
UTEE
Ref : VMware, www.cloudcredibility.com
I would like to share This VMware Hand-on Labs with you..
It is completely free but not for the whole vmware technologies.
But I'm think that you will be satisfied after you joined this labs.
Ok Let's go
1) Go to the this link ... http://communities.vmware.com/community/vmtn/resources/how
2) And Click on the "VMware Hands-on Labs – Public Beta Interest List"
3) On the next link click "next"
4) Then, fill the require information, then click "submit"
5) After that, you may be wait 1 or 2 day from their mail to set the password to access lab. After got the email from ProjectNee, set the password for your account and Join the labs... :)
6) After set the password for your account, go to this link and put your email address and password to get lab with your account https://www.projectnee.com/HOL/
7) Here, Now you can join the lab by action on "ENROLL" button.
>>
UTEE
Ref : VMware, www.cloudcredibility.com
Thursday, 3 January 2013
NIC Teaming On VMware ESXi
This will show you to how to create a teaming with 2 nics on VMware ESXi 5.0 .
Why we need the nic teaming for a virtual environment?
" A NIC team can share the load of traffic between physical and virtual networks among some or all of its members, as well as provide passive failover in the event of a hardware failure or network outage. " By kb.vmware
Ok Let's start..
1) Connect to your ESXi box with the vSphere Client..
2) Choose the "Configuration"
3) Choose "Networking" from the Hardware Panal
4) Click "Add Networking"
5) Choose "Virtual Machine" and click "Next"
6) Choose "Create a vSphere Standard switch" and tip on the 2 nics which are you want to prefer to be a teaming then click the "Next"
7) Click "Next"
8) Click "Finish"
9) Click the "Properities" of created vSwitch
10) Choose "VM Network" and Click the "Edit"
11) Click the "NIC Teaming" tab.
12) Tip on the "Load Balancing" and choose the "Route based on the originating virtual port ID" then click "Ok".
13) Click "Close"
Now Nic teaming is finish !! We can define the TCP/IP information by adding "VM Kernal" on that vSwitch..
>>
UTEE
Ref:
- http://kb.vmware.com
This will show you to how to create a teaming with 2 nics on VMware ESXi 5.0 .
Why we need the nic teaming for a virtual environment?
" A NIC team can share the load of traffic between physical and virtual networks among some or all of its members, as well as provide passive failover in the event of a hardware failure or network outage. " By kb.vmware
Ok Let's start..
1) Connect to your ESXi box with the vSphere Client..
2) Choose the "Configuration"
3) Choose "Networking" from the Hardware Panal
4) Click "Add Networking"
5) Choose "Virtual Machine" and click "Next"
6) Choose "Create a vSphere Standard switch" and tip on the 2 nics which are you want to prefer to be a teaming then click the "Next"
7) Click "Next"
8) Click "Finish"
9) Click the "Properities" of created vSwitch
10) Choose "VM Network" and Click the "Edit"
11) Click the "NIC Teaming" tab.
12) Tip on the "Load Balancing" and choose the "Route based on the originating virtual port ID" then click "Ok".
13) Click "Close"
Now Nic teaming is finish !! We can define the TCP/IP information by adding "VM Kernal" on that vSwitch..
>>
UTEE
Ref:
- http://kb.vmware.com
Wednesday, 17 October 2012
Getting Performance Result of Your Server (Shared, VPS, Dedicated or Cloud)
Server တလံုးရဲ့ Performance, I/O, Bandwidth, Monthly Cost.. ေတြ ဆိုတာ ဂ႐ုမစိုက္လို႕ မရဘူးဗ်.. ကိုယ္ရဲ့ လိုအပ္ခ်က္နဲ႕ Server က support ေပးႏိုင္မႈကို ခ်ိန္ကိုက္ အသံုးျပဳမယ္ဆိုရင္ေတာ့ End-User ကို အေကာင္းဆံုး support ေပးႏိုင္မွာပါ.
ဒီမွာေတာ့ ကိုယ္ရဲ့ လက္ရွိ Server က တျခား Server/host ေတြနဲ႕ဆိုရင္ဘယ္ေလာက္ ကြာတယ္ဘာညာကို တိုင္းတာဖို႕ ဒီ Benchmark ဆိုတဲ့ script ကိုသံုးျပီး ခ်ိန္ကိုက္ၾကည့္ပါမယ္.. Result ထြတ္လာျပီးရင္ေတာ့ ကိုယ္ရဲ့ I/O Resource ေတြက လိုအပ္ခ်က္နဲ႕ ကိုက္ညီမႈ ရွိမရွိ ကို တိုင္းတာ ဆုံးျဖတ္ ႏိုင္ျပီေပါ့
ကိုယ္ဟာ Performance, I/O, Bandwidth, Monthly Cost.. စတဲ့ လိုအပ္ခ်က္ ေတြနဲ႕ Server တခု တည္ေထာင္ ေတာ့မယ္ ဆိုရင္လဲ ဘယ္ hosting ဘယ္ type က ကိုယ္ရဲ့ လိုအပ္ခ်က္နဲ႕ ကိုက္ညီ ႏိုင္ မလဲဆို တာကို ဒီေနရာမွာ ေယဘူယ် ၾကည့္ႏိုင္ ပါတယ္...
ကဲ စျပီး Run ဖို႕ အတြက္ Script ကို ဒီ Link ကေန Download လုပ္လိုက္ပါ..
ျပီးရင္ မိမိ Run မဲ့ Server ေပၚ upload လုပ္ပါ ျပီးရင္ Package ကို Unzip လုပ္ပါမယ္..
ျပီးရင္ script ကို execute လုပ္လို႕ရေအာင္ permission ကို change ေပးရပါမယ္..
# cd Crowd9-Benchmark-4ccfe8a/
# chmod +x *
Script ကို စ Run ပါမယ္..
# ./sb.sh 'localhost' 'testbenchmark' 'yourmail@mail.com' '\\$100/mth'
localhsot = your hostname
testbenchmark = description of server name
yourmail@mail.com = your email address
\\$100/mth = Monthly Cost
Script ကို စျပီး Run လုပ္လိုက္တာနဲ႕ Server ေပၚမွာ Script အတြက္ လိုအပ္ Package ေတြကိုသူ႕ဟာသူ Install လုပ္ပါလိမ့္မယ္..
Note : Running Time ကေတာ့ နာရီနဲ႕ကို ခ်ီျပီး ၾကာပါလိမ့္မယ္..
Note : Result (Online/txt) ကို Script Run တုန္းက ထည့္ခဲ့တဲ့ Email Address ဆီကို sent ပါလိမ့္မယ္
သင့္ရဲ့ Server BenchMark က ဘယ္ေလာက္ရွိလဲ ... ???? :)
>>
UTEE
Ref : http://serverbear.com/
: https://github.com/Crowd9/Benchmark
Tuesday, 10 April 2012
vCenter Server Linux Virtual Appliance တလုံး Setup လုပ္ျခင္း
vCenter Server တခုကို စျပီး Setup လုပ္မယ္..
vCenter Server တခုကို ESXi Server ေပၚသို႕ Deploy/Install လုပ္ပံုကို ဤေနရာ တြင္ ၾကည့္ပါ။
Deploy/Install လုပ္ထား ျပီးသား vCenter Server Image ကို Power-On လိုက္ပါ။
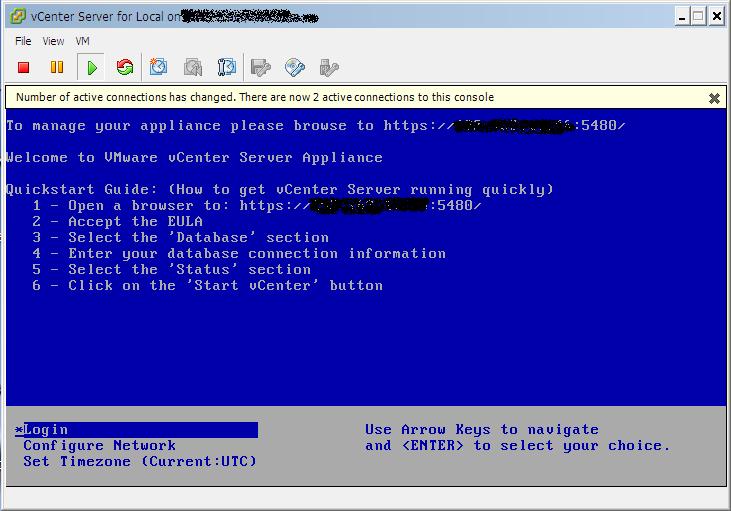
Power-On ျပီးရင္ ေအာက္ကပံု အတိုင္း ျမင္ရပါမယ္..
ဤေနရာတြင္ IP information နဲ႕ပတ္သတ္ျပီး Assign လုပ္ရပါမယ္ အကယ္၍ Network ထဲတြင္ DHCP Server ရွိရင္ေတာ့ DHCP Server က ဒီ vCenter Server Image အတြတ္ IP information ကို Auto Assign လုပ္သြားမွာပါ DHCP Server မရွိရင္ေတာ့ IP information ကို ကိုယ္ဟာကို “Configure Network” ေရြးခ်ယ္ျပီး Assign လုပ္ေပးရပါမယ္.
ဤေနရာတြင္ TimeZone ကိုလည္း Setup လုပ္ဖို႕ မေမ့ပါနဲ႕ Setup လုပ္ဖို႕ေမ့ခဲ့ရင္ေတာ့ တျခားေသာ ESXi Server ေတြရဲ့ TimeZone နဲ႕မတူရင္ vCenter Server ထဲကို ESXi Server တလုံးကို Adding လုပ္တဲ့ အခါ အခက္အခဲ ေတြ႕ႏိုင္ပါတယ္..
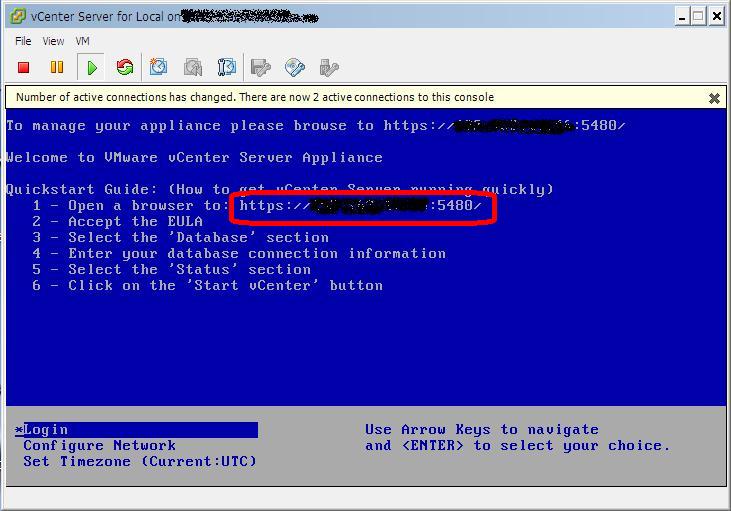
IP Information Setup လုပ္ျပီးသြားရင္ေတာ့ vCenter Server ရဲ့ တျခားေသာဟာမ်ားကို Setup လုပ္ဖို႕ အတြတ္ vCenter Serverကို Web-Browser မွ Access လုပ္ရန္ IP and Port ကိုေပးပါလိမ့္မယ္
ထို IP:port နဲ႕ Web-Browser မွ server ကို configure လုပ္ဖို႕ Login ဝင္လိုက္ပါ.. vCenter Server Image ရဲ့ Default Username နဲ႕ Password က ေအာက္ပါ အတိုင္းပါ..
Username : root
Password : vmware
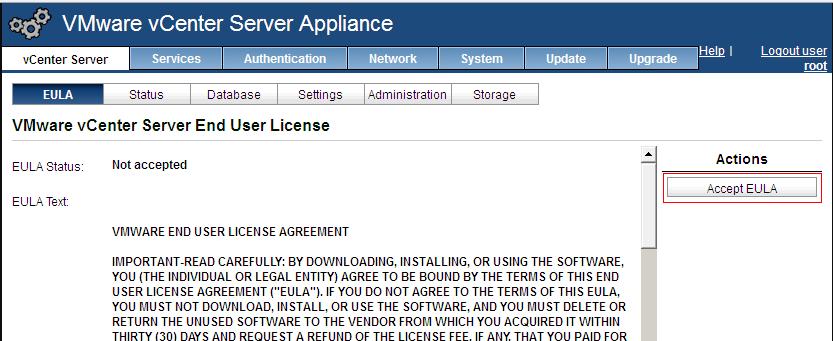
EULA ကို Accept လုပ္ေပးဖို႕ ျဖစ္ပါတယ္..
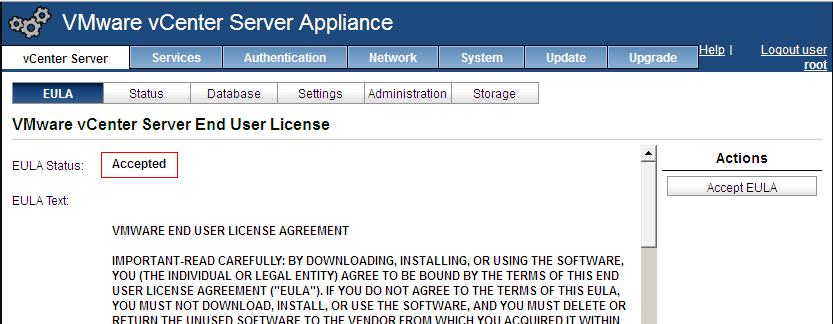
Accept EULA button ကို ႏွိပ္ျပီး Accept လုပ္ေပးလိုက္ပါ .. Accept EULA button ႏွိပ္ျပီး သြားရင္ေတာ့ EULA-Status မွာ Accepted ဆိုျပီး change သြားပါမယ္..
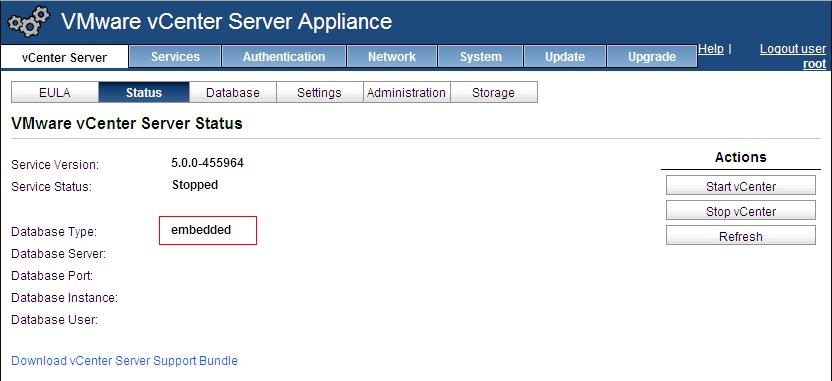
vCenter Server ရဲ့ Status ကို ၾကည့္ရန္ Status Tag ကိုသြားလိုက္ပါ အဲဒီမွာ Service Status နဲ႕ Database Type မွာ Not Configured ဆိုျပီ ျပေနပါမယ္ ...
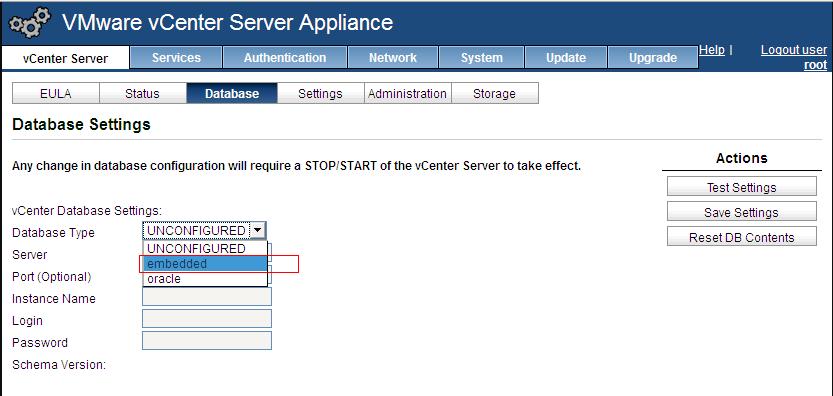
Database ကို Configure လုပ္ရန္ Database Tag ကိုသြားလိုက္ပါ.. ထိုေနာက္ Database Type မွာ embedded type ကို ေရြးခ်ယ္ ေပးရပါမယ္ DB2 database type ကို ေရြးခ်ယ္ အသုံးျပဳျခင္းပါ..
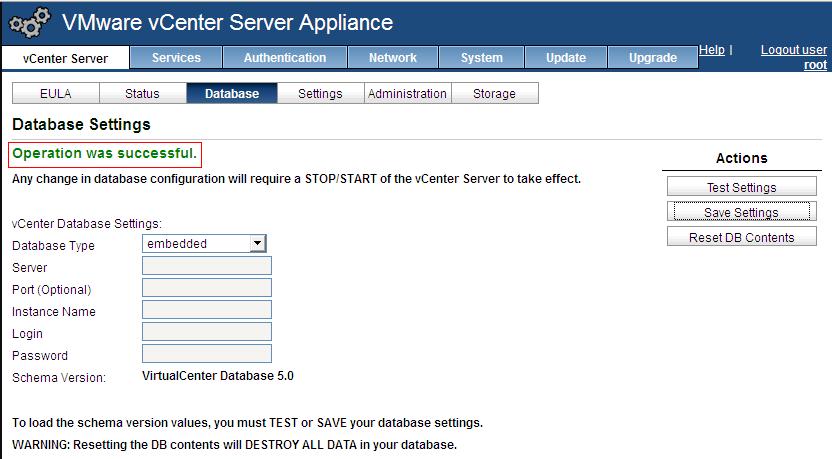
ထိုေနာက္ Save Settings ကို ႏွိပ္ျပီ Save လိုက္ပါ Operation Was Successful ျဖစ္သည္ အထိ ေစာင့္ပါ..
vCenter Serverရဲ့ Status ကိုျပန္သြား ၾကည့္ရင္ Database Type မွာ embedded ဆိုျပီ ေပၚလာပါမယ္
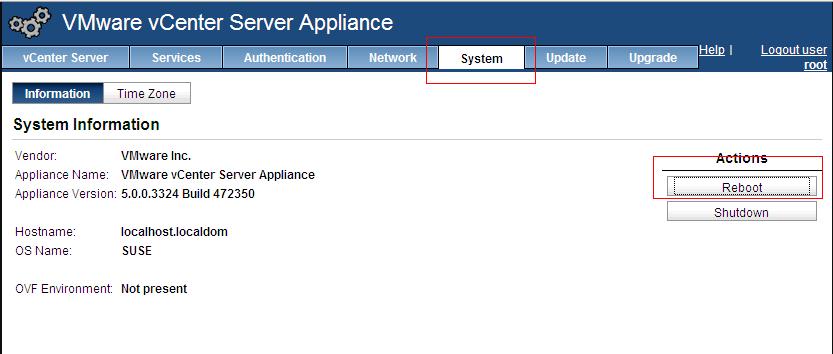
ဒါဆိုရင္ေတာ့ Database Type လဲ ေရြးခ်ယ္ ေပးျပီးျပီ ျဖစ္သည့္ အတြက္ Server ကို Rebootလုပ္ရန္ System Tag ကိုသြားျပီ Reboot ကိုႏွိပ္ပါ
Reboot လုပ္ျပီး Server ျပန္တက္လာရင္ vSphere Client မွ အေစာက လုပ္ခဲ့တဲ့ IP နဲ႕ Username:root Password:vmware တို႕နဲ႕ vCenter Server ကို Login ဝင္ျပီ vCenter Server Control ကိုလုပ္ႏိုင္ပါျပီ
UTEE
Ref : http://vmwire.com/2011/07/15/vsphere-vcenter-server-linux-virtual-appliance-quick-start-guide/
vCenter Server Appliance (Template OVF) တခုကကို ESXi Server ေပၚကို Deploy လုပ္ျခင္း
ဒီမွာေတာ့ vCenter Server Appliance (Template OVF) တခုကကို ESXi Server ေပၚကို Deploy လုပ္ပုံကို ျပပါမယ္..
Note : Template : vCenter Server 5 Appliance
ESXi Server Version : 5
အရင္ vCenter Server 5 Appliance Template (OVF + VMDK) Files ေတြကို ေအာက္ပါ အတိုင္း www.vmware.com မွ Download လုပ္ပါ.
How to download vCenter Server Appliance
You may not be able to find so easily the VSA, therefore I’ve decided to guide you through steps.
Note : Template : vCenter Server 5 Appliance
ESXi Server Version : 5
အရင္ vCenter Server 5 Appliance Template (OVF + VMDK) Files ေတြကို ေအာက္ပါ အတိုင္း www.vmware.com မွ Download လုပ္ပါ.
How to download vCenter Server Appliance
You may not be able to find so easily the VSA, therefore I’ve decided to guide you through steps.
1. Select Support & Downloads and click on Account Login.
2. Log in to the by entering user credential if account already exists or create a new account by registering yourself.
3. Select Evaluation and Free Products as Destination, then vSphere Datacenter Products and Submit.
4. Expand the Download the management server and select below products for download.
Download လုပ္ျပီး သြားျပီ ဆိုရင္ေတာ့ vSphere Client 5 နဲ႕စျပီ လုပ္ပါမယ္.
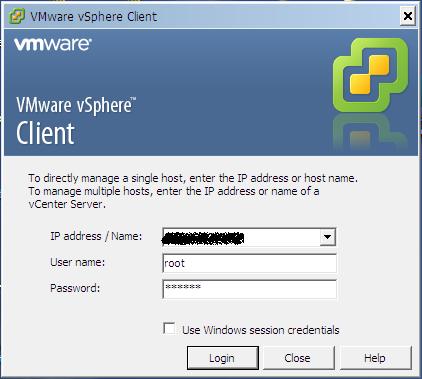
vSphere Clientနဲ႕ ESXi Server ကို Login ဝင္လိုက္ပါ..
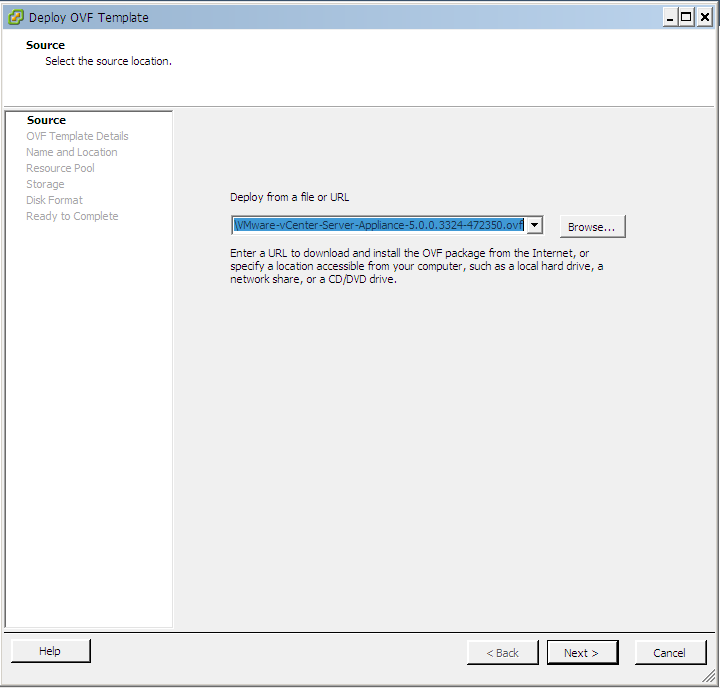
Loginဝင္ ျပီးသြားရင္ေတာ့ ToolBar > File > Deploy OVF Template ကို Click ပါ.
Source မွာေတာ့ အေစာက Download လုပ္ထားတဲ့ Files ထဲက OVF extension နဲ႕ File ကိုေရြးလိုက္ပါ
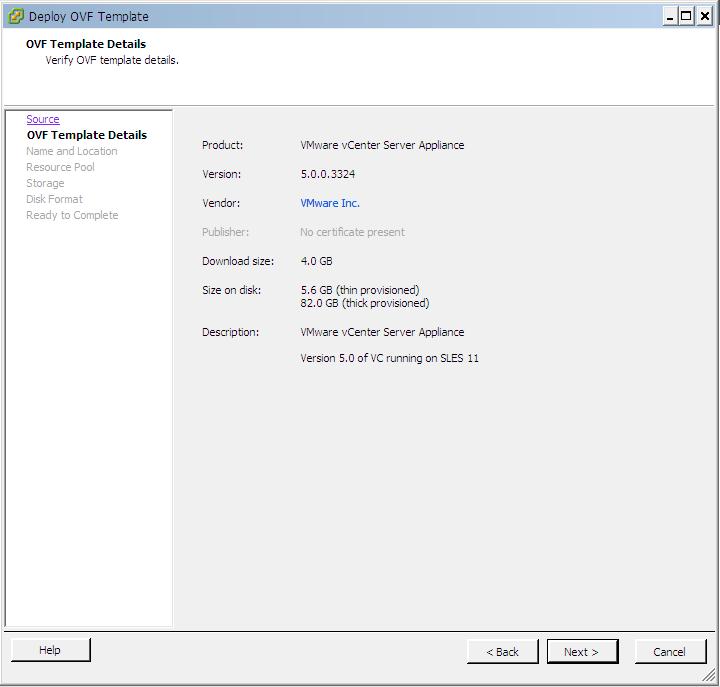
အခု Deploy လုပ္မဲ့ Template ရဲ့ Information ကိုျပပါလိမ့္မယ္..
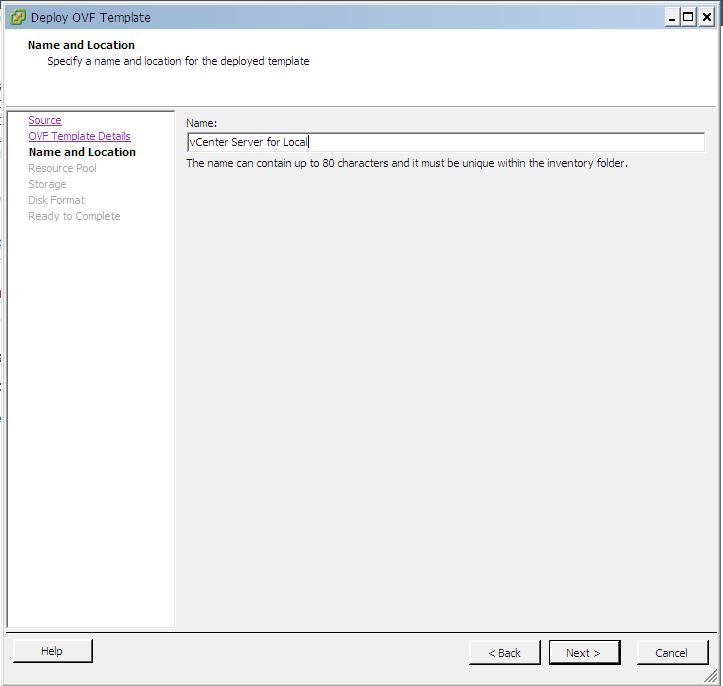
Template ရဲ့ Name ကို ကိုယ္ဟာကို ေရြးခ်ယ္ သတ္မွတ္ ေပးပါ
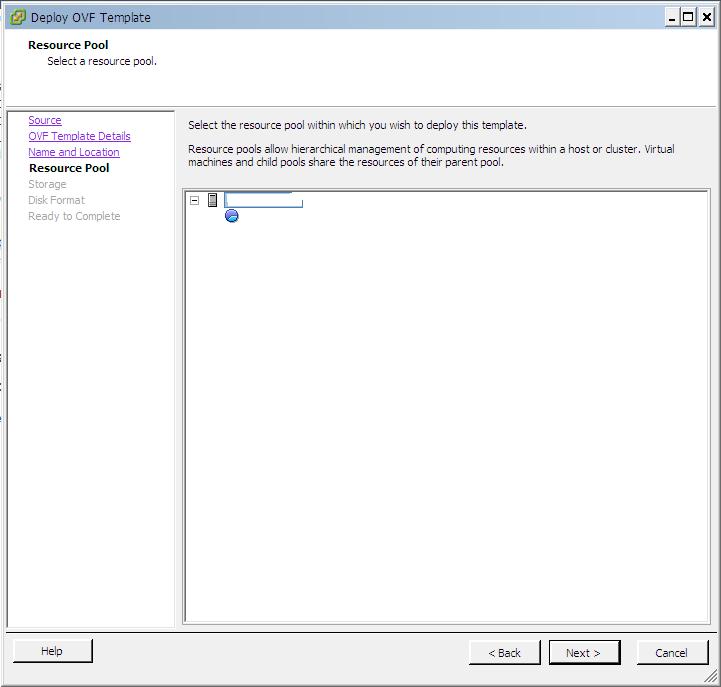
Server ေပၚက ဘယ္ Resource Pool မွာ Deploy လုပ္မယ္ဆိုတာ ေရြးခ်ယ္ပါ
Server ေပၚက ဘယ္ Storage မွာ Store လုပ္မယ္ဆိုတာ ေရြးခ်ယ္ပါ
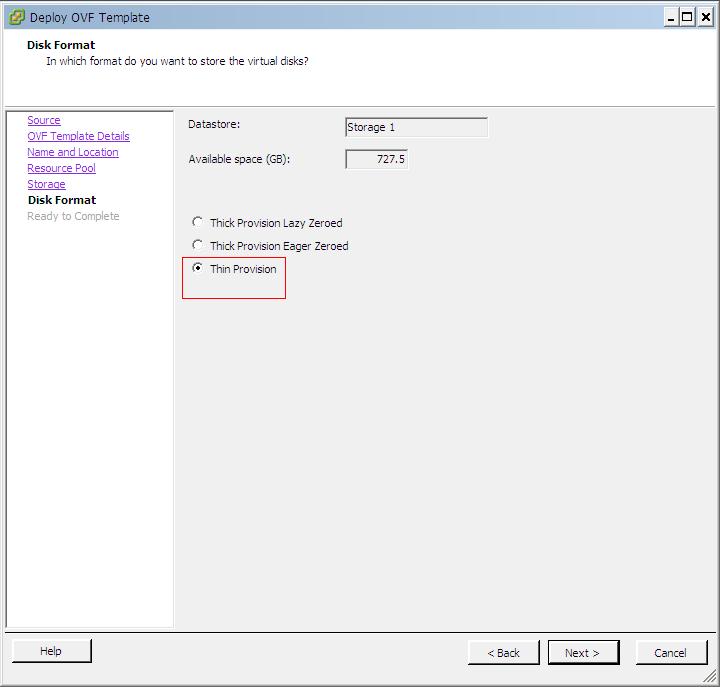
Format Type ကိုေတာ့ Thin Provision နဲ႕ပဲ လုပ္မယ္ဆိုတာ ေရြးခ်ယ္ပါ
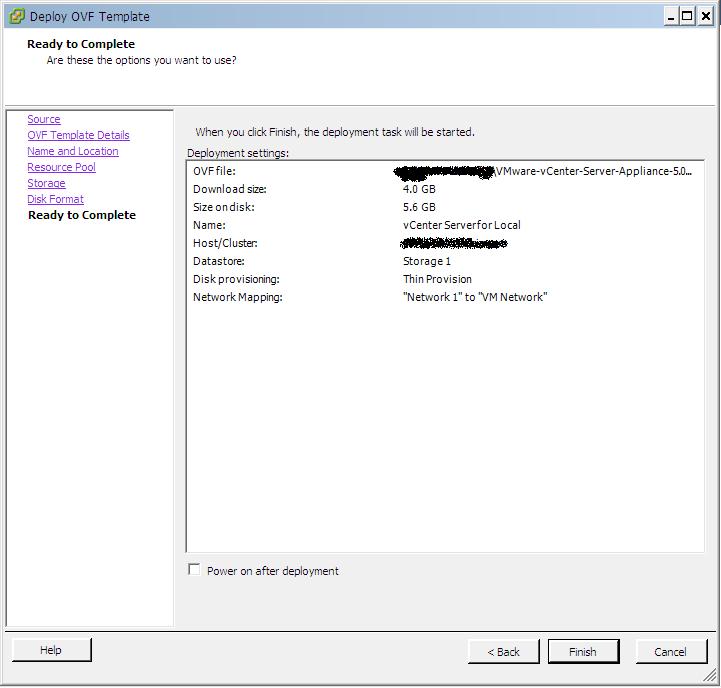
ေနာက္ဆုံး Deploy မလုပ္ခင္ Information ကိုျပ ပါလိမ့္မယ္
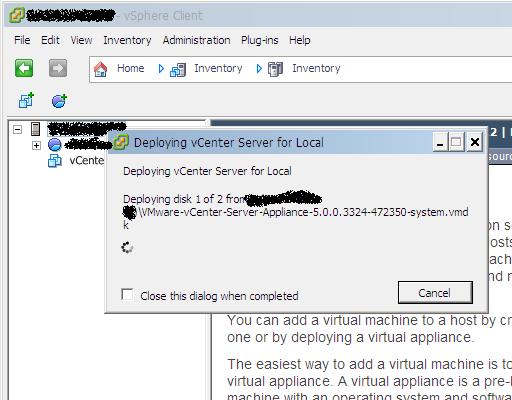
Deploy လုပ္ေနပါျပီ
Deploy Process ျပီးသြားရင္ေတာ့ Server ေပၚမွာ Deploy လုပ္လိုက္တဲ့ VM Image ေပၚလာပါျပီ
vCenter
Server 5 Appliance တခုကို ESXi Server ေပၚကို Deploy လုပ္တဲ့ အဆင့္
ျပီဆုံးပါျပီ တျခားေသာ Template ေတြကိုလဲ ဒီလိုပဲ Deploy လုပ္ႏိုင္ပါတယ္
>>
UTEE
Ref : http://www.learnmsexchange.com/hot-topics/563-vmware-vsphere-5-vcenter-server-appliance-vcsa
>>
UTEE
Ref : http://www.learnmsexchange.com/hot-topics/563-vmware-vsphere-5-vcenter-server-appliance-vcsa
Wednesday, 16 November 2011
VMware Disk Image Drive ကို Size ဘယ္လို Extend ထက္တိုးမလဲ..
တခါတုန္း office မွာ user ကအကူအညီ တခုေတာင္းလာတယ္.. သူအသံုးျပဳ ေနတဲ့ VMware Image တခုမွာ Virtual Hard-Drive ကျပည့္ခါနီး ေနျပီတဲ့.. Virtual Hard-Drive ကို Extend လုပ္လို႕ ရမလား တဲ့.. သာမန္ ဆိုရင္ ေနာက္ထက္ Virtual Hard-Drive တခုကို Add လုပ္ေပး လိုက္႐ံု ပဲေပါ့.. ဒါေပမဲ့ သူလိုခ်င္တာက ေနာက္ Hard-Drive တလုံး( ေနာက္ Partition) အသစ္တခု မဟုတ္ဘူး..ဥပမာ.. သူ vmware image မွာ virtual hard-drive တခုပဲ ရွိတယ္ size က 10Gb.. သူက အယ္ဒီ မူရင္း virtual hard-drive (10Gb) ကို size (20Gb) extend လုပ္ခ်င္တာ..
အစေတာ့ နဲနဲ စဥ္းစား သြားတယ္ ေနာက္ေတာ့ Virtual ပါဆို ရရ မွာေပါ့ဆိုျပီ ရွာၾကည့္ေတာ့ တေနရာ မွာသြားေတြ႕တယ္...
VMware WorkStation Install လုပ္ထာ:တဲ့ စက္ ေတြမွာဆိုရင္ အဲဒီ tool ကပါျပီသား..
Tools Name: vmware-vdiskmanager
Use with : Command Prompt
သာမန္ အားျဖင့္ c:\programs\vmware\vmware-workstation ေအာက္မွာပါ။
Extend လုပ္ခ်င္တဲ့ Virtual Hard-Drive Name က ABC.vmdk ဆိုပါေတာ့.. command prompt (cmd) ကေနျပီ c:\programs\vmware\vmware-workstation ေအာက္ကိုသြားလိုက္ပါ..
# cd c:\programs\vmware\vmware-workstation
ေအာက္က command နဲ႕ ကိုလိုခ်င္တဲ့ size ကို extend လုပ္ပါတယ္ (အရင္ 10GB ရွိတာကေန ေနာက္ထက္ 10GB ထက္တိုးမယ္ထား , အဲဒီေတာ့ total 20GB ေပါ့)
# vmware-vdiskmanager -x 20GB ABC.vmdk
အဲဒါ ေလးပဲ....Process ျပီးတဲ့ အထိ ေစာင့္လိုက္ပါ..
မွတ္ခ်က္: Extend လုပ္မဲ့ VMware Image မွာ Snapshot ေတြ Clear ျဖစ္ရပါမယ္။ ေနာက္ အဲဒီ VMware Image က Power-Off ထားရ ပါမယ္..
ဒါကေတာ့ ေနာက္မွ ရွာေတြတဲ့ vdiskmanager ရဲ့ အသံုးျပဳနည္းပါ
http://www.vmware.com/pdf/VirtualDiskManager.pdf
ဒီ Link ကေတာ့ extend လုပ္ျခင္း အတြက္ vmware knowledge-base ပါ..
http://kb.vmware.com/selfservice/microsites/search.do?language=en_US&cmd=displayKC&externalId=1004047
>>
UTEE
အစေတာ့ နဲနဲ စဥ္းစား သြားတယ္ ေနာက္ေတာ့ Virtual ပါဆို ရရ မွာေပါ့ဆိုျပီ ရွာၾကည့္ေတာ့ တေနရာ မွာသြားေတြ႕တယ္...
VMware WorkStation Install လုပ္ထာ:တဲ့ စက္ ေတြမွာဆိုရင္ အဲဒီ tool ကပါျပီသား..
Tools Name: vmware-vdiskmanager
Use with : Command Prompt
သာမန္ အားျဖင့္ c:\programs\vmware\vmware-workstation ေအာက္မွာပါ။
Extend လုပ္ခ်င္တဲ့ Virtual Hard-Drive Name က ABC.vmdk ဆိုပါေတာ့.. command prompt (cmd) ကေနျပီ c:\programs\vmware\vmware-workstation ေအာက္ကိုသြားလိုက္ပါ..
# cd c:\programs\vmware\vmware-workstation
ေအာက္က command နဲ႕ ကိုလိုခ်င္တဲ့ size ကို extend လုပ္ပါတယ္ (အရင္ 10GB ရွိတာကေန ေနာက္ထက္ 10GB ထက္တိုးမယ္ထား , အဲဒီေတာ့ total 20GB ေပါ့)
# vmware-vdiskmanager -x 20GB ABC.vmdk
အဲဒါ ေလးပဲ....Process ျပီးတဲ့ အထိ ေစာင့္လိုက္ပါ..
မွတ္ခ်က္: Extend လုပ္မဲ့ VMware Image မွာ Snapshot ေတြ Clear ျဖစ္ရပါမယ္။ ေနာက္ အဲဒီ VMware Image က Power-Off ထားရ ပါမယ္..
ဒါကေတာ့ ေနာက္မွ ရွာေတြတဲ့ vdiskmanager ရဲ့ အသံုးျပဳနည္းပါ
http://www.vmware.com/pdf/VirtualDiskManager.pdf
ဒီ Link ကေတာ့ extend လုပ္ျခင္း အတြက္ vmware knowledge-base ပါ..
http://kb.vmware.com/selfservice/microsites/search.do?language=en_US&cmd=displayKC&externalId=1004047
>>
UTEE
Friday, 14 October 2011
VM Image LOCK က်သြားရင္ ဘယ္လို လုပ္ ရမလဲ???
သင္ရဲ့ Snapshot ေတြနဲ႕ Run ေနတဲ့ VM-Image က ပံုပါ အတိုင္း LOCK က်သြား ျပီဆိုပါေတာ့...
ဘာလို႕ LOCK က်တာ လဲဆိုတဲ့ အေၾကာင္းအရင္း ကေတာ့။။။ .vmdk file ေတြတခု ထက္ပို ရွိလာလိုပါ. ဘာလို႕ .vmdk ေတြပို လာလဲဆိုေတာ့ Snapshot ေတြေၾကာင္. ပိုလာတာ ပါ..အဲဒီ Snapshot Disk (snapshot file extension with .vmdk) ေတြထဲကတခု က LOCk က်သြားတာပါ...
VMware က .vmdk file ေတြကို Name မထက္ေအာင္ ေတာ့ ခြဲ ျပီ Save ပါတယ္... ( ဥပမာ ။ yourVMimage-xxxx1.vmdk)
ဒီ Problem က VM-Image ကိုတေနရာကေန တေနရာ ကို (to different LUM (logical unit number)) ေရႊ႕ တယ္ ျပီးေနာက္ အရင္ေနရာ (to same LUN) ကို ျပန္ ေရႊ႕တဲ့အခါ မ်ိဳး OR ေနာက္ .vmx file corrupted ျဖစ္တဲ့ အခါမ်ိဳးမွာ ျဖစ္တတ္ပါတယ္..
(အဲဒီ အခါ မွာ သင္ဟာ အဲဒီ VM-Image ရဲ့ Folder ေအာက္က MAIN ျဖစ္တဲ့ .vmdk file ကို copy လုပ္ ၊ ျပီေနာက္ New Virtual Machine အသစ္ create လုပ္ျပီ HDD ေနရာမွာ Existing Virtual Disk ကို point ေပးျပီ ျပန္ Run ရင္ Run ႏိုင္ပါတယ္..ဒါေပမဲ့ Snapshot ေတြဆီ ျပန္သြား ခ်င္ရင္ဘယ္လို လုပ္မလဲ??)
ဒီေနရာ မွာ Snapshot ေတြလဲ မပ်က္ဘူး Lock က်တာလဲ Clear ျဖစ္ဖို အလြယ္ဆုံး နည္းလမ္း ကေတာ့ သင္ရဲ့ VM-Image Folder ေအာက္က .lck နဲ႕ဆုံးတဲ့ file ေတြကို delete လုပ္လိုက္ ပါ ျပီ:ရင္ သင္ VM-Image ကိုျပန္ Run ပါ OK သြားပါ လိမ္မယ္...
သိတာ ေလး share လိုက္ပါသည္...:)
Note: " ေရႊ႕" ကို burglish တြင္ ႐ိုက္တာ မရလို Gtalk တြင္ ႐ိုက္ ေပးေသာ May Net (Internet and Game Center) အား ေက်းဇူး တင္ပါသည္။။.
>>
UTEE
Ref:
- http://kb.vmware.com
ဘာလို႕ LOCK က်တာ လဲဆိုတဲ့ အေၾကာင္းအရင္း ကေတာ့။။။ .vmdk file ေတြတခု ထက္ပို ရွိလာလိုပါ. ဘာလို႕ .vmdk ေတြပို လာလဲဆိုေတာ့ Snapshot ေတြေၾကာင္. ပိုလာတာ ပါ..အဲဒီ Snapshot Disk (snapshot file extension with .vmdk) ေတြထဲကတခု က LOCk က်သြားတာပါ...
VMware က .vmdk file ေတြကို Name မထက္ေအာင္ ေတာ့ ခြဲ ျပီ Save ပါတယ္... ( ဥပမာ ။ yourVMimage-xxxx1.vmdk)
ဒီ Problem က VM-Image ကိုတေနရာကေန တေနရာ ကို (to different LUM (logical unit number)) ေရႊ႕ တယ္ ျပီးေနာက္ အရင္ေနရာ (to same LUN) ကို ျပန္ ေရႊ႕တဲ့အခါ မ်ိဳး OR ေနာက္ .vmx file corrupted ျဖစ္တဲ့ အခါမ်ိဳးမွာ ျဖစ္တတ္ပါတယ္..
(အဲဒီ အခါ မွာ သင္ဟာ အဲဒီ VM-Image ရဲ့ Folder ေအာက္က MAIN ျဖစ္တဲ့ .vmdk file ကို copy လုပ္ ၊ ျပီေနာက္ New Virtual Machine အသစ္ create လုပ္ျပီ HDD ေနရာမွာ Existing Virtual Disk ကို point ေပးျပီ ျပန္ Run ရင္ Run ႏိုင္ပါတယ္..ဒါေပမဲ့ Snapshot ေတြဆီ ျပန္သြား ခ်င္ရင္ဘယ္လို လုပ္မလဲ??)
ဒီေနရာ မွာ Snapshot ေတြလဲ မပ်က္ဘူး Lock က်တာလဲ Clear ျဖစ္ဖို အလြယ္ဆုံး နည္းလမ္း ကေတာ့ သင္ရဲ့ VM-Image Folder ေအာက္က .lck နဲ႕ဆုံးတဲ့ file ေတြကို delete လုပ္လိုက္ ပါ ျပီ:ရင္ သင္ VM-Image ကိုျပန္ Run ပါ OK သြားပါ လိမ္မယ္...
သိတာ ေလး share လိုက္ပါသည္...:)
Note: " ေရႊ႕" ကို burglish တြင္ ႐ိုက္တာ မရလို Gtalk တြင္ ႐ိုက္ ေပးေသာ May Net (Internet and Game Center) အား ေက်းဇူး တင္ပါသည္။။.
>>
UTEE
Ref:
- http://kb.vmware.com
VMware Guest Image (Window, Linux, ..) တခုကို High Performance သံုးလိုရေအာင္ ဘယ္လို လုပ္မလဲ
ဥပမာ... သင္သူငယ္ခ်င္း တ ေယာက္က ငါ window OS နဲ႕မင္းလိုခ်င္တဲ့ server ကို vmware image လုပ္ထားတယ္ အဆင္သင္ သံုး ႐ံုပဲ ဆိုျပီေပးလိုက္ ျပီ ဆိုပါေတာ့.. (ဤေနရာတြင္ Local Machine တခုခုကို Vmware Converter နဲ႕ VMware Image အျဖစ္သို convert လုပ္ထားျခင္း မ်ားလဲပါဝင္သည္)
သင္လဲ copy ကူး ယူလာျပီ သင္ရဲ့ Laptop or PC ေပၚက VMware Workstation or Server or Player နဲ႕ သံုးၾကည့္ေရာ... သင္သူငယ္ခ်င္း ရဲ့စက္ေပၚမွာ စျပီ Create လုပ္ခဲ့တဲ့ VM-Image က သင္ရဲ့စက္ ေပၚမွာ RUN တဲ့အခါ Screen ကလဲ Full မျမင္ရဘူး Hardware တခ်ိဳ ကလဲ Driver ေတြမေတြ႕ဘူး ဆိုပါေတာ့... သင္သူငယ္ခ်င္း စက္ေပၚမွာ တုန္းက အေကာင္း သင္စက္ ေပၚ ေရာက္မွ Basement Hardware ခ်င္းမတူ ေတာ့ ျဖစ္တက္ပါတယ္... အဲဒီအေျခအေန မွာ VMware Tools (http://www.vmware.com/support/ws55/doc/new_guest_tools_ws.html) ကိုလိုလာပါျပီ....
VMware Workstation သံုးတဲ့သူမ်ား အဖိုက ေတာ့ VMware tool ပါျပီ သားမို လြယ္ကူ ပါတယ္...
For VMware Player User
သင္က VMware Player ကိုသံုး ျပီ RUN တယ္ ဆိုရင္ေတာ့ VMware Player Latest Version ေတြမွာ Auto မပါေတာ့ပါဘူး.
VMware Tools ကို www.vmware.com ကေန down ရင္ down OR VMware Workstation Install လုပ္ထားတဲ့ စက္တလုံး ကေန လိုအပ္တဲ့ file ေတြကို copy ျပီ ကိုသင္ရဲ့ vm-image ထဲကို install လုပ္ျခင္း ျဖစ္လဲရ ႏိုင္ပါတယ္..
File Copy ျပီ Install လုပ္မယ္ဆိုရင္ေတာ့......
1) Workstation Install လုပ္ ထားတဲ့ စက္ရဲ့ "c:\Program Files (x86)\VMware\VMware Workstation" Folder ေအာက္က "windows.iso" file ကို copy ကူး ျပီေနာက္ သင္စက္ တေနရာရာ မွာ paste လိုက္ပါ. [အဲဒီ Folder ေအာက္မွာ .iso extension နဲ႕ file (winPre2k.iso, windows.iso, solaris.iso, netware.iso, linux.iso, freebsd.iso) မ်ားကို ေတြႏိုင္ပါတယ္.. အခု vm-image က window OS ဆိုေတာ့ windows.iso ေပါ့ Linux OS ဆိုရင္ linux.iso ေပါ့ ]
2) အဲဒီ windows.iso ကို သင္ vmware player ရဲ့ Edit Virtual machine setting ထဲက CD/DVD section ေနရာမွာ iso ကို သံုးမယ္ဆိုျပီ သင္ ရဲ့ windows.iso ထားထား တဲ့ေနရာ ကို point ေပးလိုက္ပါ..
3)သင္ရဲ့ vm-image ကို power-on လိုရပါျပီ. သင္ရဲ့ vmware os ထဲက cd/dvdrom ကို ဖြင့္ျပီ vmware tools ကို install လုပ္လိုရ ပါျပီ။ installation ကနဲနဲ ေတာ့ၾကာ ပါတယ္။။ ျပီေနာက္ vmware OS ကို Reboot လုပ္လိုက္ပါ... သင္ရဲ့ VMware OS ကို Check ၾကည့္လိုက္ပါ... VMware Tools Install မလုပ္ခင္ ကနဲ႕ ကြာသြားပါ လိမ္မယ္...
>>
UTEE
Ref:
- http://kb.vmware.com
သင္လဲ copy ကူး ယူလာျပီ သင္ရဲ့ Laptop or PC ေပၚက VMware Workstation or Server or Player နဲ႕ သံုးၾကည့္ေရာ... သင္သူငယ္ခ်င္း ရဲ့စက္ေပၚမွာ စျပီ Create လုပ္ခဲ့တဲ့ VM-Image က သင္ရဲ့စက္ ေပၚမွာ RUN တဲ့အခါ Screen ကလဲ Full မျမင္ရဘူး Hardware တခ်ိဳ ကလဲ Driver ေတြမေတြ႕ဘူး ဆိုပါေတာ့... သင္သူငယ္ခ်င္း စက္ေပၚမွာ တုန္းက အေကာင္း သင္စက္ ေပၚ ေရာက္မွ Basement Hardware ခ်င္းမတူ ေတာ့ ျဖစ္တက္ပါတယ္... အဲဒီအေျခအေန မွာ VMware Tools (http://www.vmware.com/support/ws55/doc/new_guest_tools_ws.html) ကိုလိုလာပါျပီ....
VMware Workstation သံုးတဲ့သူမ်ား အဖိုက ေတာ့ VMware tool ပါျပီ သားမို လြယ္ကူ ပါတယ္...
For VMware Player User
သင္က VMware Player ကိုသံုး ျပီ RUN တယ္ ဆိုရင္ေတာ့ VMware Player Latest Version ေတြမွာ Auto မပါေတာ့ပါဘူး.
VMware Tools ကို www.vmware.com ကေန down ရင္ down OR VMware Workstation Install လုပ္ထားတဲ့ စက္တလုံး ကေန လိုအပ္တဲ့ file ေတြကို copy ျပီ ကိုသင္ရဲ့ vm-image ထဲကို install လုပ္ျခင္း ျဖစ္လဲရ ႏိုင္ပါတယ္..
File Copy ျပီ Install လုပ္မယ္ဆိုရင္ေတာ့......
1) Workstation Install လုပ္ ထားတဲ့ စက္ရဲ့ "c:\Program Files (x86)\VMware\VMware Workstation" Folder ေအာက္က "windows.iso" file ကို copy ကူး ျပီေနာက္ သင္စက္ တေနရာရာ မွာ paste လိုက္ပါ. [အဲဒီ Folder ေအာက္မွာ .iso extension နဲ႕ file (winPre2k.iso, windows.iso, solaris.iso, netware.iso, linux.iso, freebsd.iso) မ်ားကို ေတြႏိုင္ပါတယ္.. အခု vm-image က window OS ဆိုေတာ့ windows.iso ေပါ့ Linux OS ဆိုရင္ linux.iso ေပါ့ ]
2) အဲဒီ windows.iso ကို သင္ vmware player ရဲ့ Edit Virtual machine setting ထဲက CD/DVD section ေနရာမွာ iso ကို သံုးမယ္ဆိုျပီ သင္ ရဲ့ windows.iso ထားထား တဲ့ေနရာ ကို point ေပးလိုက္ပါ..
3)သင္ရဲ့ vm-image ကို power-on လိုရပါျပီ. သင္ရဲ့ vmware os ထဲက cd/dvdrom ကို ဖြင့္ျပီ vmware tools ကို install လုပ္လိုရ ပါျပီ။ installation ကနဲနဲ ေတာ့ၾကာ ပါတယ္။။ ျပီေနာက္ vmware OS ကို Reboot လုပ္လိုက္ပါ... သင္ရဲ့ VMware OS ကို Check ၾကည့္လိုက္ပါ... VMware Tools Install မလုပ္ခင္ ကနဲ႕ ကြာသြားပါ လိမ္မယ္...
>>
UTEE
Ref:
- http://kb.vmware.com
Subscribe to:
Posts (Atom)